Showing posts with label stashbuster. Show all posts

Saturday, 25 March 2023

21 and Black & White #2

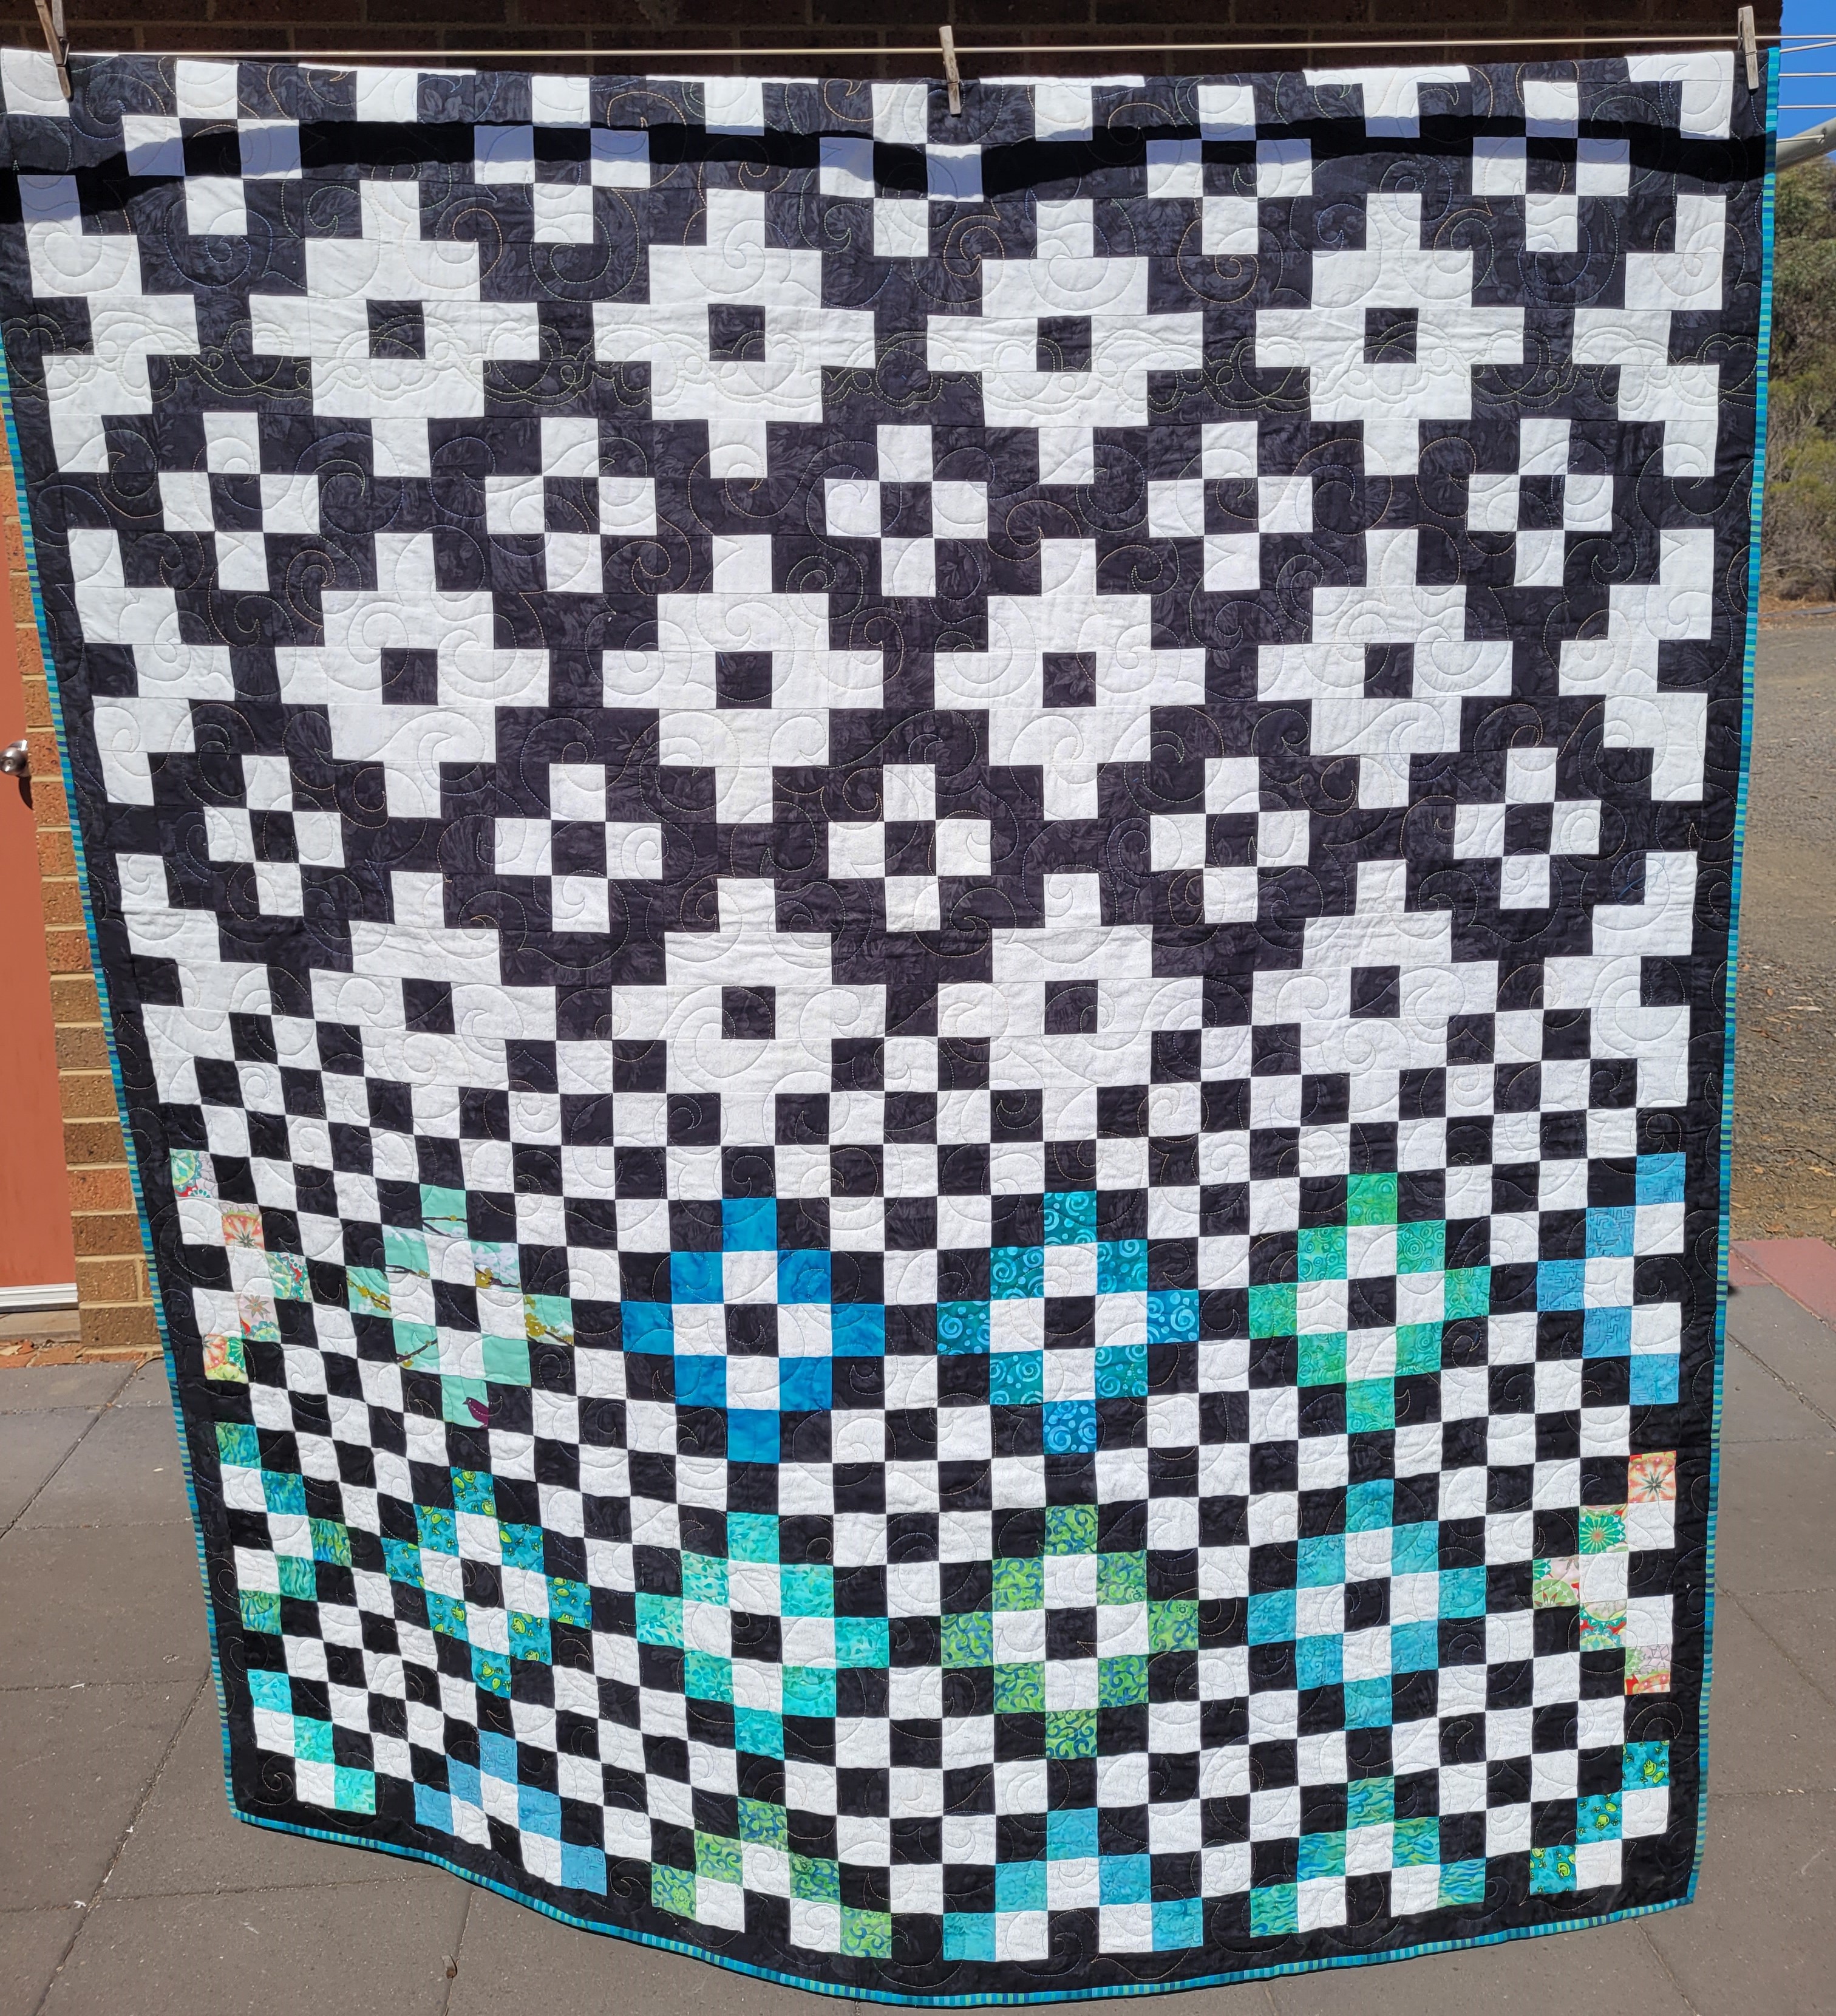
Another black and white quilt.  Another 21st.  This is the first of 2 quilts for twins who turned 21 a few weeks ago.  A great use of stash with left over pieces from several quilts in the colours and two pieces of good quality left over wide backs - ie:  the black and white fabrics.


I spent a whole day cutting out and carefully labelling the pieces for the each of the blocks.  While it looks simple, the placement of the black, white and colours did get a bit confusing at times. 

I took this quilt away on retreat last year to get the bulk of the sewing done and, with some help from my un-picker when I mixed things up,  I successfully completed the quilt top at the retreat.  I added a small narrow border of the black around the quilt top, just to keep the many seams at the edge of the quilt secure and to provide a small break between the piecing and the striped binding.


Yes, it does seem to play tricks on the eyes a little bit with all of the movement across the quilt top.  I really liked making this quilt top, even if the placement of the black and white through the centre with the merging of the blocks got confusing up close.

So bright in the sunlight!  These photos were snapped in the morning on the day of the twins 21st and the wind was picking up.


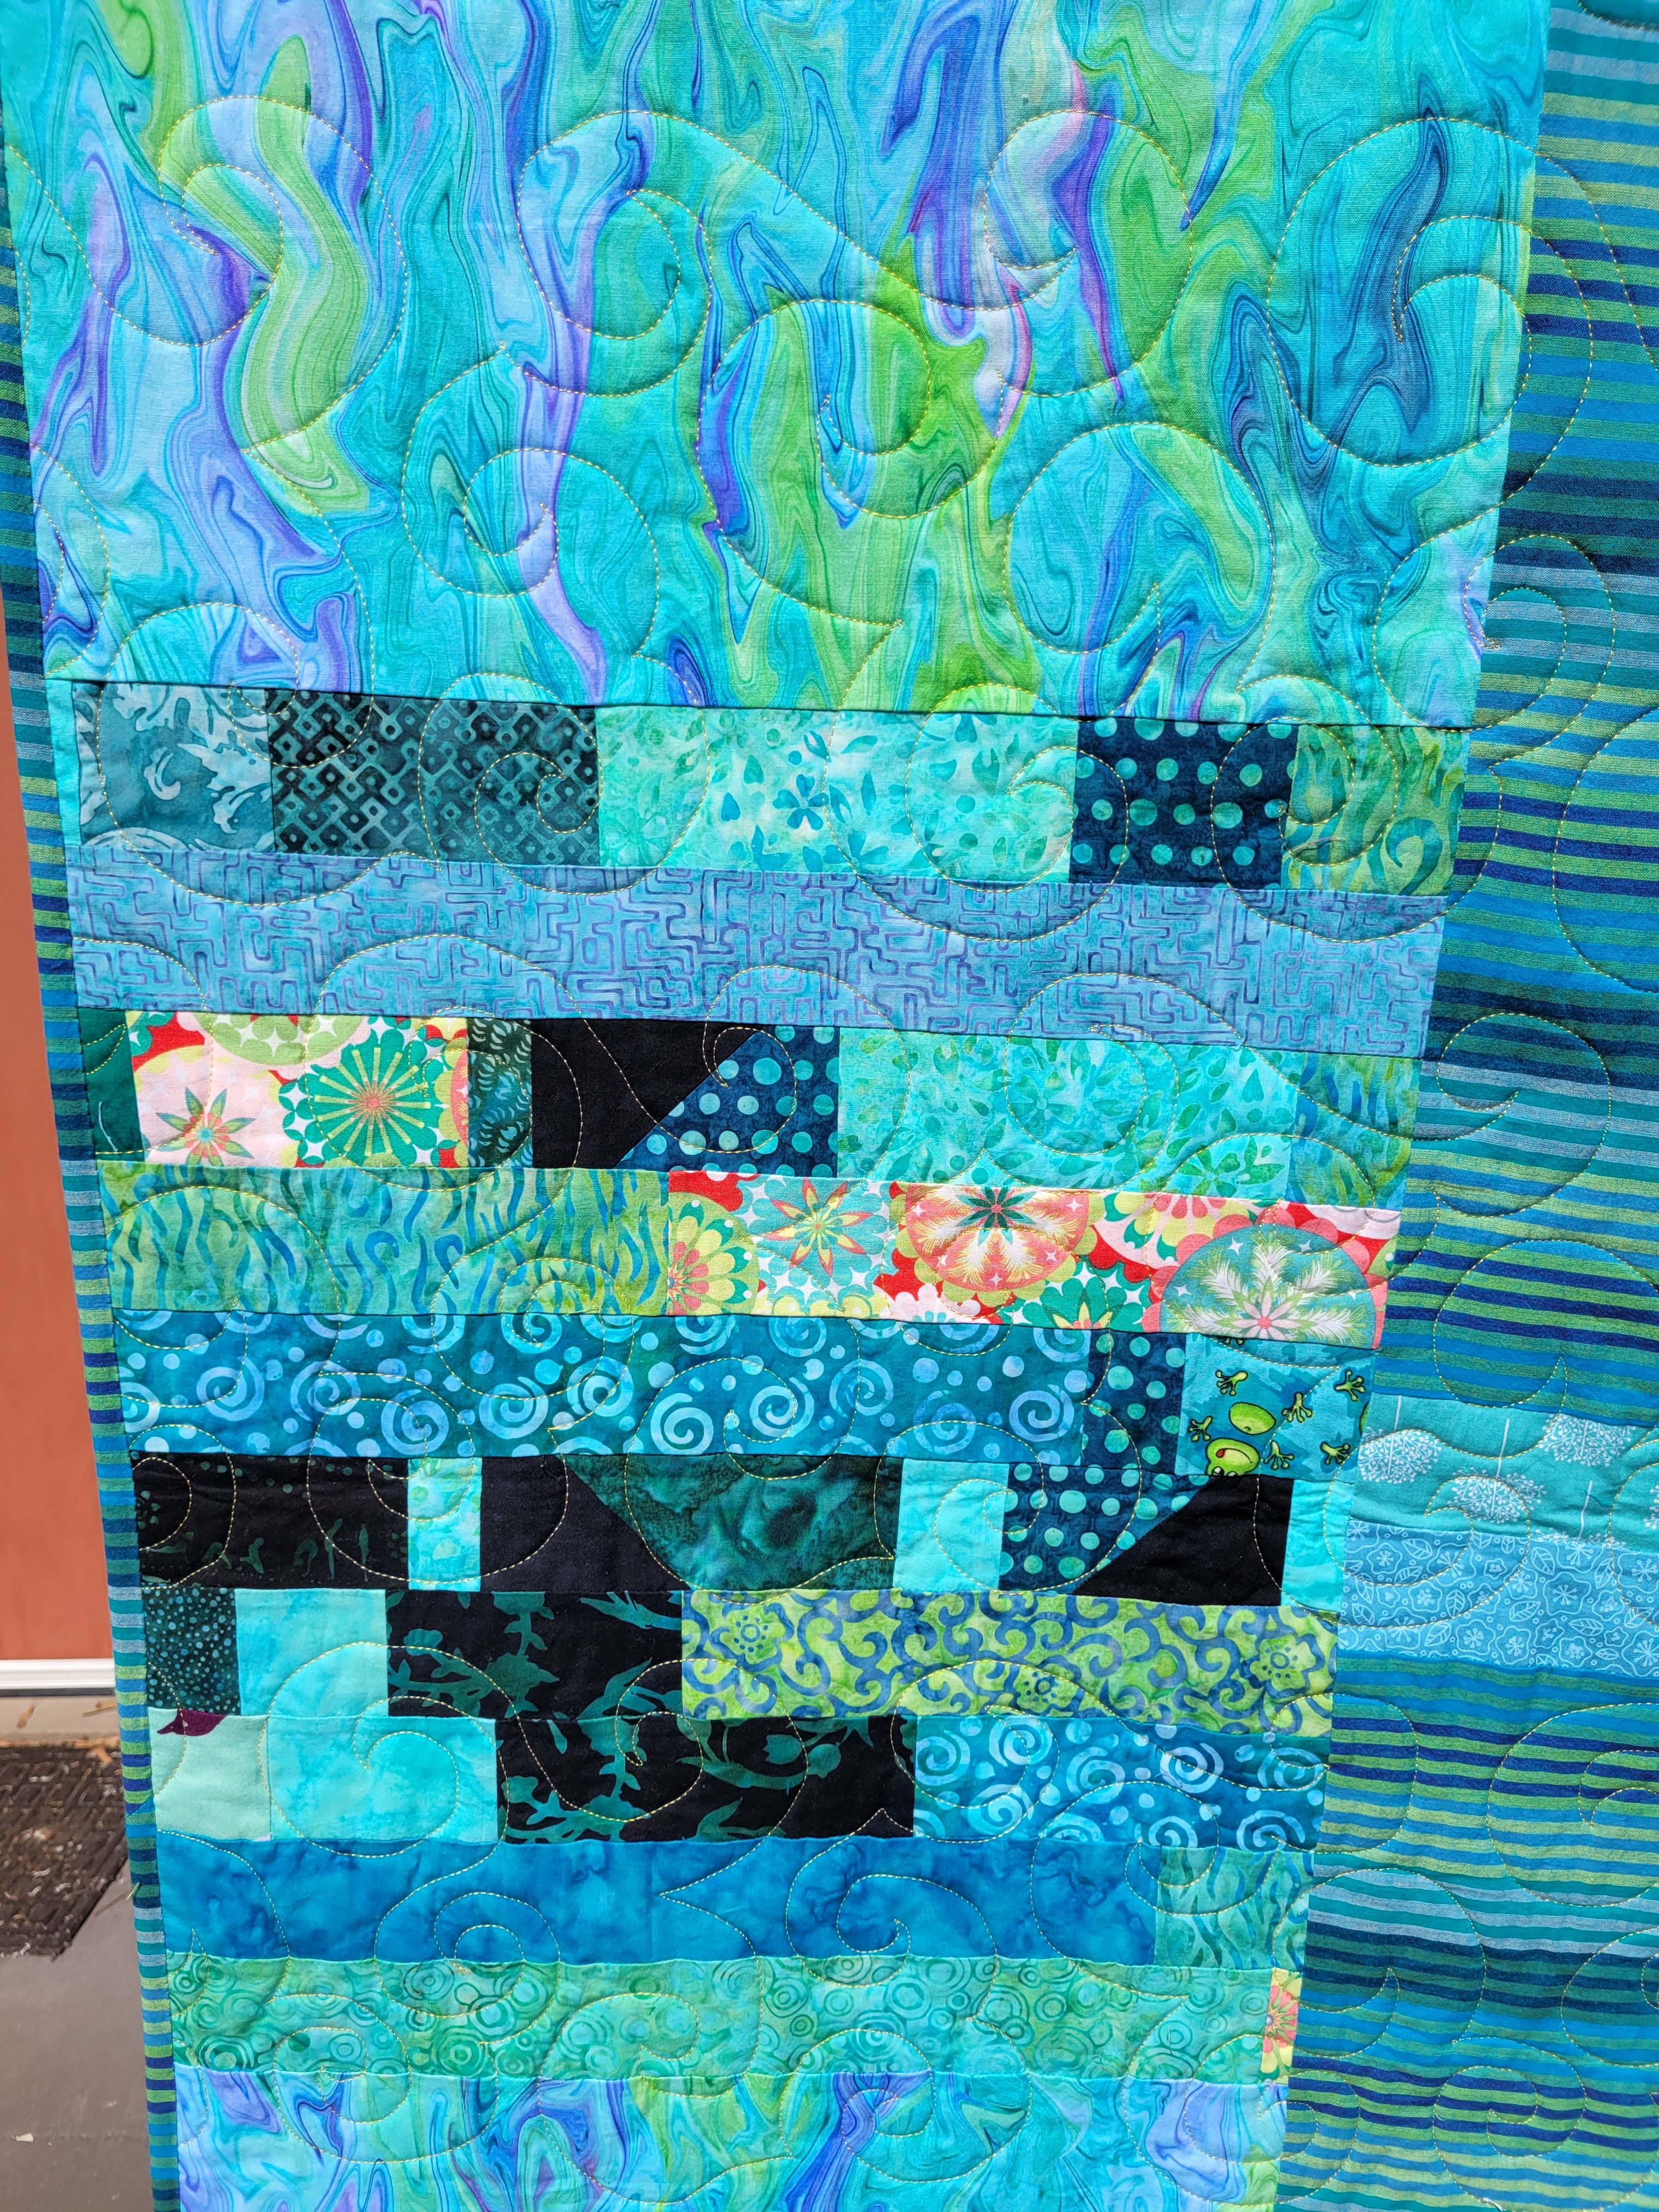
I used a woven Kaffe Fasset stripe for the binding because it had the perfect colours.  The backing has a large panel of the binding stripe fabric and all the little left over pieces, plus some extras were used to make a pieced panel.


Domestic machine quilting with a swirl and a row of tumbling hearts/leaves.  I used a Raiman variegated thread for the front of the quilt and a Superior Threads gold for the back.  Love, love this look, especially the gold on the back.


And, finally, here is the completed top in all of its sunlit glory.  


Because this particular M is studying to be an Environmental Engineer and is passionate about the world around him, this is what I wrote on his quilt label....

A conundrum, what to do with the environment?  This quilt represents the finding a way between the black and white of modern materialism and the protecting of nature where the greenery will always find a place to emerge.  Knowing that you will work hard to find your way, we wish you so much love, happiness and joy as you make your path through life. 


A few days after the 21st, the twins Dad called me up to say thank you.  He said the whole family was 'blown away' by the boys quilt gifts and that M almost cried when he read the label.

I've also had a phone call from their Mum expressing both her and their gratitude.

This family is very special to us.  We used to live in the same street and have remained firm friends for two decades now, despite our many house moves over the years.  The quilt for twin #2 is next week's post. ;) 


Gifted in February 2023.
Finished quilt size:  66in x 84in (158cm x 203cm).  

The pattern can be found here.


Saturday, 18 March 2023

21 and Black & White #1

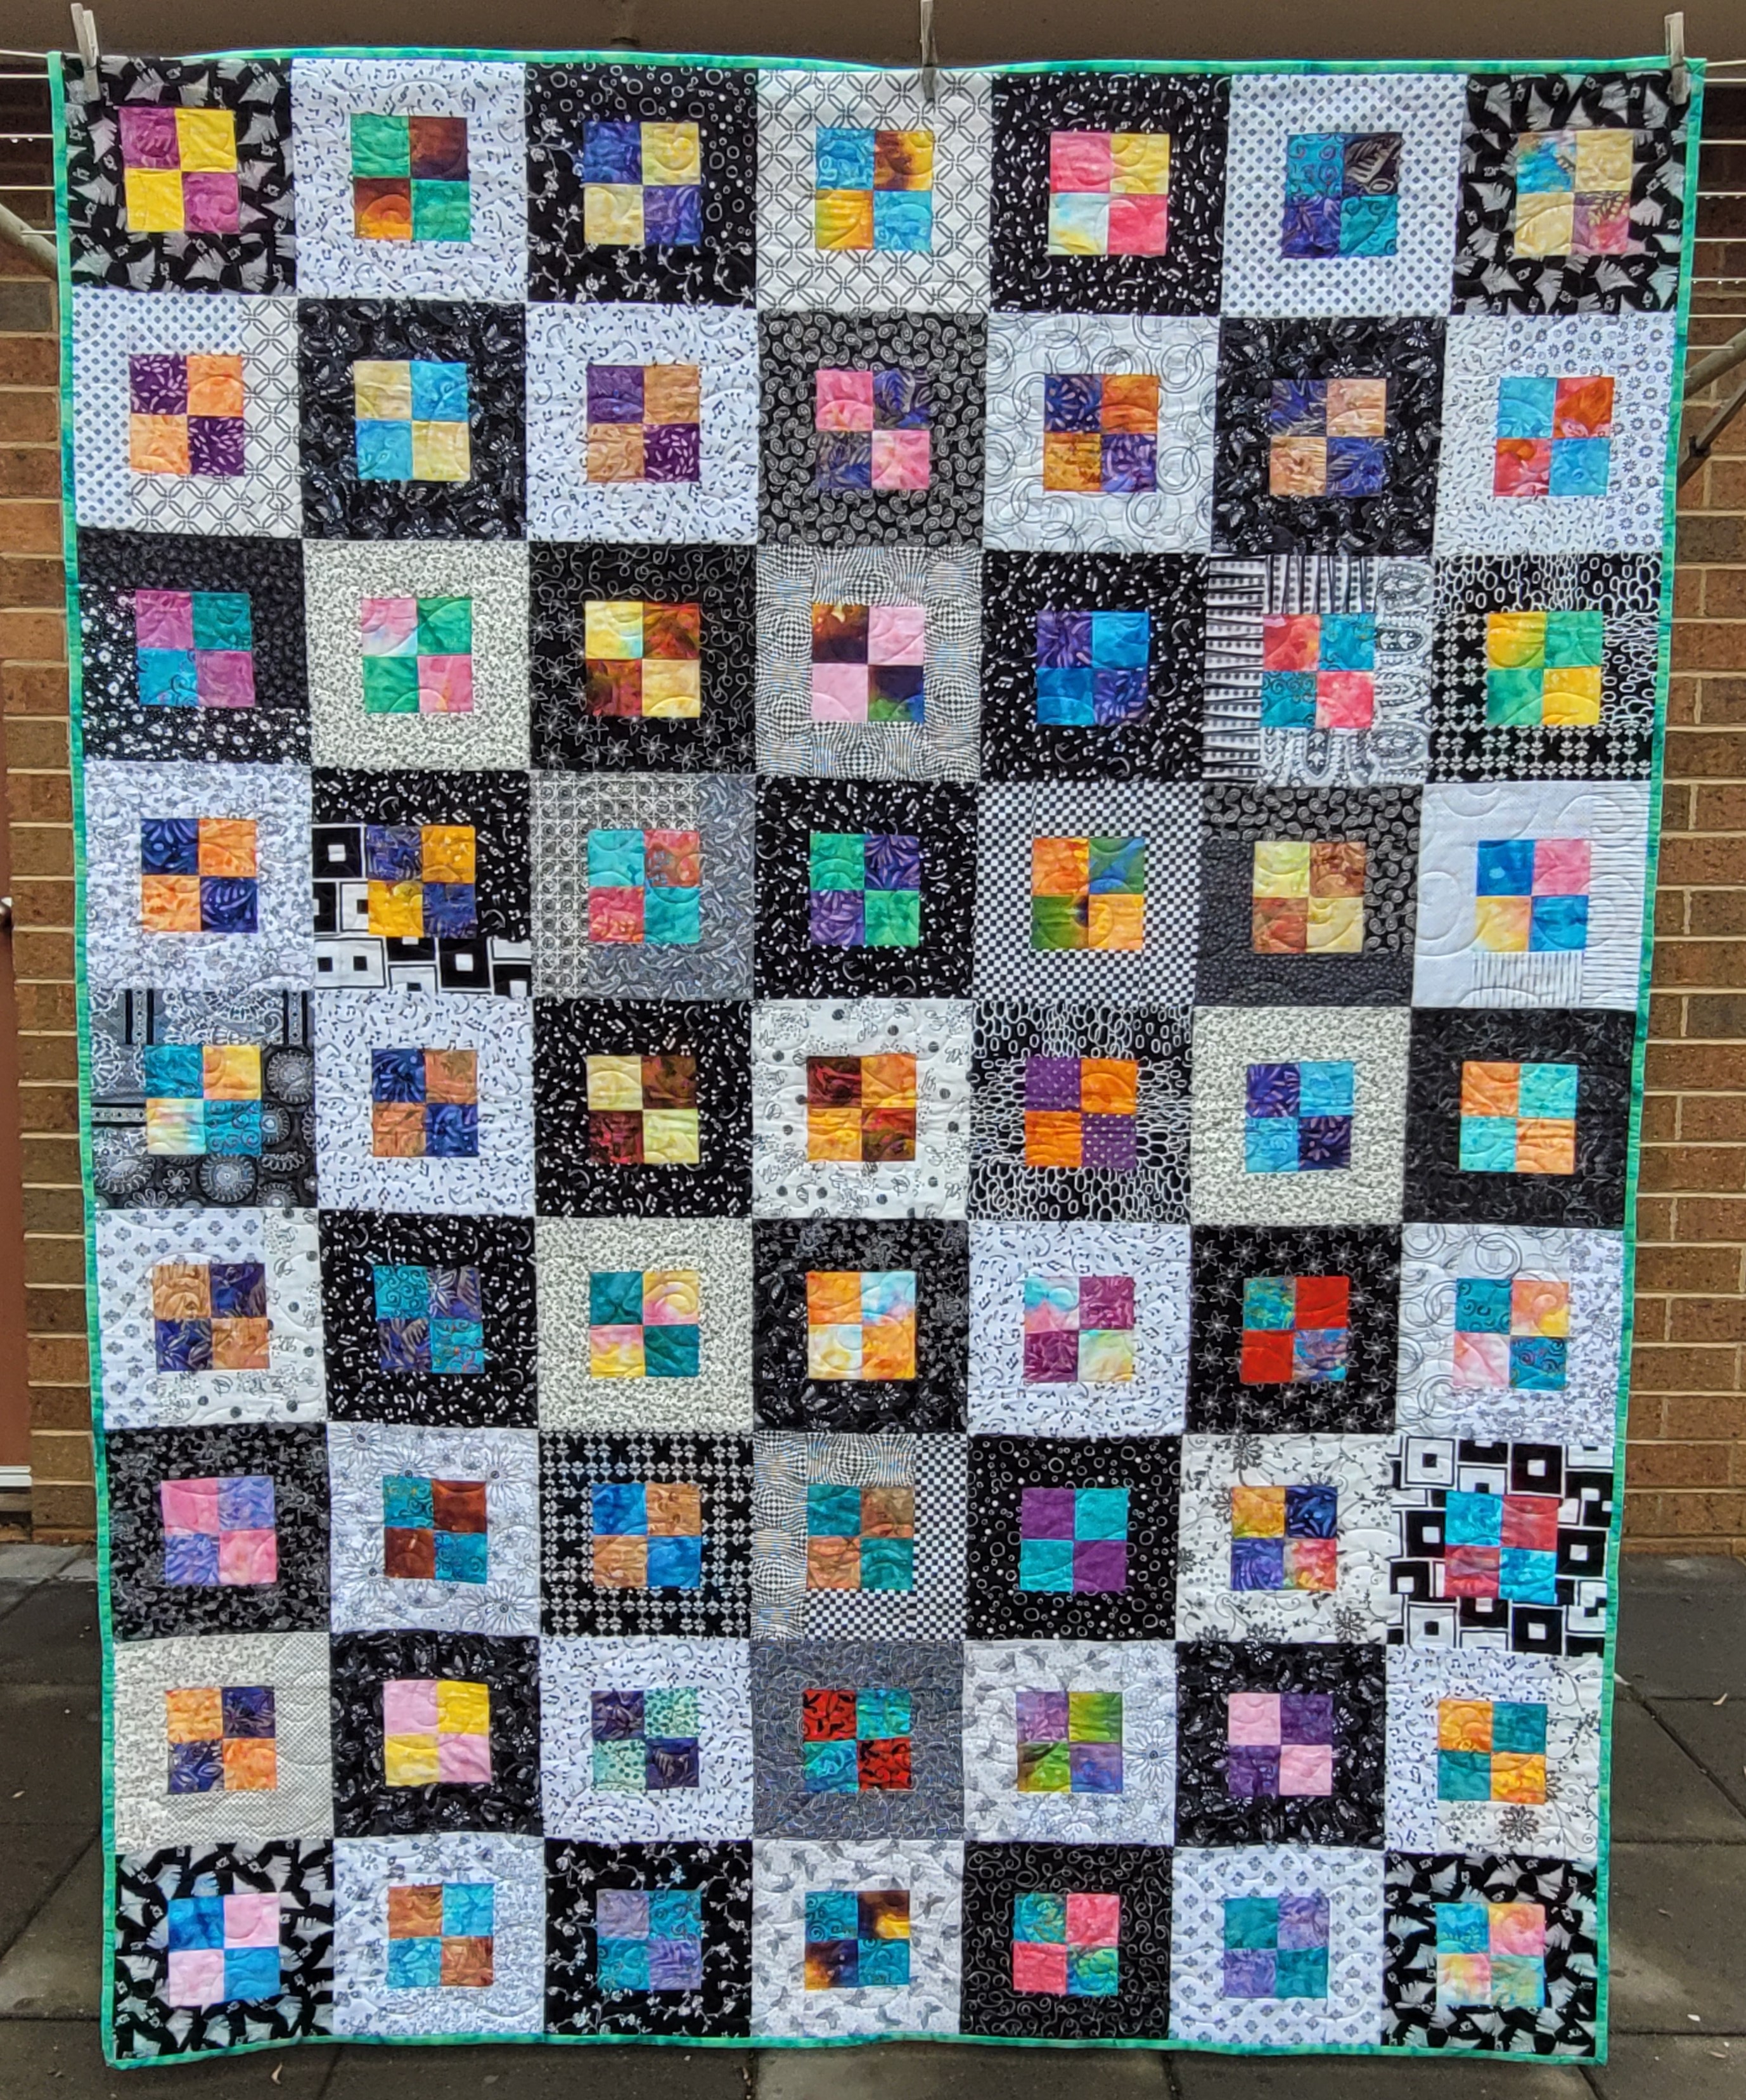
Black and White is so much fun!  This quilt has so many snippets of fabrics from other quilts that I've made over the years, plus a few extra bits thrown in from one of my friends.  There's been quite a bit of conversation among a couple of online and in person groups that I belong to about black and white with a splash of colour quilts lately, that I thought I'd share this one, which holds a special place in my heart.


I always had a particular friend of my son in mind when making this quilt top, but wasn't sure when I would give it to him, then we were invited to his 21st birthday, and voila! there was the impetus to get this one finished.  

We first met M and his mum when T and I were both in the new "Mothers Group" when M was 4 months old and my son was 3 months old, so a lot of love and memories have been stitched into this quilt.


The blocks are wonderfully simple and so effective when making them, each one giving it's own "wow" factor.  When I took the photos, it was a very dull weather day, with little sun and the colours in the blocks just 'popped' with their own vibrancy.


As I was making the quilt top, I came to realise that it didn't really matter if the black and white merged slightly into grey, there was still contrast between the blocks, with the lime/avocado green binding pulling it all together.


The back is black piece of wide-back fabric with a tone-on-tone print.  I quilted this quilt with a variegated Raiman rayon thread on the front and a Madiera avocado/lime thread on the back, which looked so funky.  Unfortunately I did not get a close up of the quilting on the back.


Wrapped and ready for gifting with the label reading:  

Dear M....., may this quilt join for celebrations, commiserations and all the moments that life will throw at you.  Each time you use this quilt, our thoughts will be with you, gently guiding and supporting.
 
Finishing at 56in x 72in, it's a perfect size for a couch quilt. 

And... one last bragging moment - when M and his partner left the 21st venue, this quilt was the only gift he took home with him, leaving his mum to pack up and collect the rest of the gifts.  An act that truly melted my heart and resulted in having a happy tears hug with T.


Completed and gifted Oct 2022.
Pattern used can be found here

Tuesday, 27 April 2021

A Panel Challenge!

At the start of March, a challenge by Shelly at Prairie Moon Quilts was issued - A Panel Challenge.  Take a panel which has been languishing in your stash for a long time and make something from it.

I discovered that for a person who really does not like panels very much, that I have 10 of them!!

This panel I had initially purchased to make a tote bag with.  I really couldn't think of what else to do, but somehow had never gotten around to doing just that, until now.  BUT, I did start working again on a reverse hand applique UFO that needed a better bag than the torn paper shop bag I was using; AND Shelly had issued the panel challenge about the same time - talk about serendipity coming into play!


I do not remember how old this panel is, only that I have had in my stash for more than 10 years.  The Jacobean style flowers on it are gorgeous and the flowers in the vase with the red frame remind of those old tapestry fire-place screens.


The writing on the right hand side of the picture is instructions for turning the panel into a quilt.  I still have those instructions for using as a feature piece on another quilt sometime in the future.


The other half of the panel was these vines with leaves on them.  I managed to used three of the vines in making the back panel of the tote bag.  The remaining vine strip has also been put aside for a future use.

Because I wasn't completely sure how this bag was going to go together and I was determined to only use what I have on hand to make it, I auditioned some fabrics from my stash to see what would and wouldn't work.  In the end I kept it very simple by using the gold/cream print for the lining and the dark teal/blue tone-on-tone leaf print for the borders, handles and gusset pieces. 


I made the back of the bag first because that had more piecing and cobbling together and I had to do some cutting and joining of the vine strips to make them the same length as the flower row.  The printing of the flower squares was quite "off grain" which meant careful cutting and joining together to get something resembling straight.

The front of the bag was simply a case of trimming the edges straight and adding borders to bring it up to the same size as the back.


Super simple gusset construction with easy rectangles for the base and side panels.  I then made a second bag body with the lining fabric, added the handles, top-stitched around the top of the bag to stop the lining from pulling out and sewed up the turn hole on the inside and it was done!  Two half days of work and it was done!

I did not use any wadding/batting because I want it to squash down for easy packing with travel projects and then it can 'flop open' on a table at sewing days.


The front of the bag is shown above and the back of the bag is shown below.


And... inside the bag is the above-mentioned reverse applique project from 2012 which I have not touched since 2012 until a couple of months ago - oops - that I put into this bag so my new tote bag from a panel has an intended purpose.


A "one-off" bag that I am very happy to have made and I met the challenge requirements too!!  


**  There is no pattern for my Panel Bag.  I made it up as I went along with ideas jotted in my notebook.  
 

Monday, 2 March 2020

Paper Doilies, Log Cabins and a very quilty week...

Last week was so very, very quilty!  Lots of sewing time to be had. 😊

It was a wonderful week. Tuesday was 3 hours with a group, followed closely by Thursday which was slow stitching at a local shop for 2.5 hours.  I took an English Paper Piecing  (EPP) project.

My "doily" so far.  There's still another round to attach,
but I haven't chosen the colour yet.
The diamond spaces are left blank for the
background to show through.


This is my "Paper Doily" project which I started in 2019 at a class with Leesa Chandler.  I attended the class so that I could learn something new.  I had never realised all the other possibilities before of using paper pieces to make up patterns like this.  I had always attached them to each other and thought that was it.  Once the final round is attached, the whole piece will be appliqued onto a background.  Such a fun thing to do with some stash fabric and paper pieces.

Friday was the day for my local quilt group.  I had plans to take my machine and continue working on Specky Stars, however, other things called me away and I didn't get there.

On Saturday, 29/02 - Leap Year Day - I attended a 10am-10pm sewing day with a group 1 hour away.  I took a scrappy red/white log cabin of my own design to work on.  I spent quite a bit of time both before and after Christmas cutting into my red and white leftovers from previous projects (scrap) stash.  Being 100% cut out and having lots of chain piecing, which is very repetitive, was a fantastic thing to do while catching up with friends.


I stood up and looked over the back of my machine
for this shot.  Lots of chain piecing.
Plastic tub with each piece cut and in piecing
order from the centre out.


With a bit of luck, this log cabin quilt will hopefully be published into a pattern.  It's been quite a while since I last ran a class and wrote a proper pattern.

On top of pattern writing and making the relevant quilts, I have a self-imposed goal of completing 9 quilts by the end of July and 4 of those quilts I plan to exhibit.  A couple will become gifts, 1 is for a class and the other 2 I am not sure where they are headed to yet.

I'm feeling as 'pleased as punch' right now.  My goals are on track and I've spent some very precious time with some very special people.   Life is good.


Monday, 12 August 2019

Now I can share! - 1718 Simplified

Ahhh, the major exhibitions are over, for now and I can finally share my 1718 Simplified Quilt story.....

My excitement which I shared last year can now be shown as photos and I can tell the whole story of my own amazing personal journey.

The 1718 quilt had been a “want to make” quilt for me for many, many years, after I first saw a photo of it almost 20 years ago.  The chance to make my own version of the 1718 Coverlet and to travel to the UK from Australia with my quilt to visit the original quilt was truly a dream come true.

It was a picture, a very small picture inside the front cover of a patchwork book.  Interesting shapes and designs, seeming to be both logically placed and then random at the same time.  A conundrum.  One that I wanted to solve.  It was 15 years from when I saw that first little photo until I could start to make my own quilt.

During 2014, I chanced upon a brief advertisement, the quilt I had been coveting in the picture was being faithfully reproduced and a book was to be published.  In early 2015, I became the owner of that very newly released book...  The 1718 Coverlet:  69 Quilt Blocks from the Oldest Dated British Patchwork Coverlet by Susan Briscoe.

Getting there....
For a long time, it seemed like I wasn't really getting anywhere with the blocks.  I would prepare some applique blocks, put them into a zip loc sandwich bag and take them in my hand-bag for filling in waiting time or while on travelling.  When sewing in small stints and then changing to the next block, I lost where I was up to.  It wasn't until I laid all the blocks out on the floor, that I realised how far I had progressed.

I would often have little machine sewing sessions where I would make a group of blocks, say, all the square in a square, then maybe the hourglass blocks.  I found by doing this way, I could match things up a bit.  The 1718 Coverlet is symmetrical from left to right, but not top to bottom.  This was something I did not realise by looking at the book, but only picked up on when I was laying out the blocks.

There were many techniques used in the making of this quilt, including applique, piecing, english paper piecing, templates, fussy cutting and more.

Adding in the centre
A true labour of love - taking 3 years to make, with lots of hand and machine work.  Each block was carefully made, pressed and trimmed to the correct size. 


Completed centre panel.  Just love it!

I used a very, very fine wadding, called QuiltLite.  It was like a fine interfacing, but with a bit more give in it.  With so many seams and lots of applique, I wanted my quilt to hold and have a little bit of body to it because I wanted it to hold up to handling and hanging during the exhibitions.

Detail showing quilting with 100 weight invisafil thread and a 60/8 needle. 
The thread is a fine line, about the thickness of hair running down the needle shaft.

I used a very fine #100 weight thread to quilt each block to closely mimic the "coverlet" style of the original quilt, which it to make it look like it has no quilting over the patchwork.

Blocks after quilting before trimming and assembling.


Assembled blocks after quilting

Detail showing how the quilt as you was assembled without cover strips.
The method I chose for quilting allowed me to use a whole piece of fabric for the backing, with some stitch in the ditch on in the seam lines to attach it to the front with no sagging.

Not all blocks were easy to make, but all were very rewarding.


Ta Da!  A fully quilted, bound and labelled quilt.  Totally elated!

The coming together of this quilt was a complete joy.  Every block was wonderful to make, except the ‘cockerel’ (the block must have known that I don’t like chooks in general!!!).  My quilt has been called ‘1718 Simplified’ because I did not piece the applique backgrounds, allowing the unique shapes to be highlighted.  I used modern piecing and quilting techniques.

In June 2018, I was notified that my quilt had been accepted as part of the 1718 Exhibition at the Festival of Quilts, in Birmingham - a huge event that is well renowned on the world quilting calendar.  Of course I had to hand deliver it!  Off I went, with the quilt carefully packed into my hand luggage.  An incredible experience where I got to see the original 300 year old coverlet -WOW - attend lectures about the 1718 Coverlet; meet others who made their own versions of the coverlet and get my book signed by the author.

At The Festival of Quilts

1718 Simplified has been exhibited at and appeared in:
  • 2018 - Festival of Quilts, Birmingham, UK - part of the special exhibit celebrating 300 years of the original quilt.
  • 2018 Nov - Axedale Antics (local paper).  Article I was asked to write, telling my story of how and why I made the 1718 Coverlet.
  • 2018 - Quilt Mania magazine - issue 128 Nov-Dec 2018- Celebrating 300 years of Britain's oldest dated patchwork coverlet article.
  • 2019 January to May - with Grosvenor Shows, UK, as part of a travelling exhibition highlighting the 1718 Quilts throughout England.  Newark 18-20 January;  Ardingly 25-27 January; Harrogate 22-24 February; Duxford 8-10 March;
    Exeter 29-31 March; Quilts UK Malvern 16-19 May.
  • 2019 July - Victorian Quilters Showcase, Melbourne, Aust. - entrant in the mainly pieced, amateur, single person category.  Received an Highly Commended Award.
  • and is slated to appear in one or two more exhibitions during 2019.


Quilt Hanging in Melbourne at Victorian Quilters Showcase
My winning ribbon!

And.... would I make a second one?  Yes, I would.  

1718 has been the most interesting, at times challenging and
most delightful quilt that I have ever made.  

Thank you to those who supported me for your faith in me,
especially my Aunt Libby, who just "gets it"
and my husband Baden for his never ending patience and love.


Monday, 3 June 2019

Purple Floral

Started in a mystery quilt workshop, run by a member of my local quilt group, we were instructed to "not purchase fabric".  The requirement was to only use what is in your stash and to make it scrappy.  Well, I had no bits of scraps of any sort at that stage, having recently used them up, but, I did have big pieces and a few of them.

Backing onto front.
The lady running the workshop was concerned that with just 3 fabrics and not much variety that it might not work.  I think, had the purple floral been a tone-on-tone, it might not have.  There is so much variety in the print of the purple fabric, that it carries the pattern well.

Centre of quilt detail
We were instructed to pre-cut our fabrics before the workshop so that we could sew like the wind when there.  Each little zip-loc baggie had to be labelled so that we didn't get mixed up when the instructions were given out during the day.

Border detail
 Finished off with a french braid border, to which I added a 9-patch blocks to the corners.

I quilted Purple Floral on my domestic machine with clamshells over the centre of the quilt in a dusky purple 50wt thread, echo straight line quilting in the first border with brick red thread and then beads in the squares of the french braid with matching thread.

Back of quilt showing detail of the quilting.
I had great joy in completing this quilt this past week because I was able to complete it for my best friend from primary school for her 50th birthday.

I love the serendipity of how project completion often has someone who will be perfect for the item just appear.

Completed quilt.
 A really terrific pattern with dramatic effect.  Rectangles and squares, all flipped and turned to provide movement in the quilt top. 
Wrapped and ready for gifting.
Finishing at 161cm x 188cm (63in x 74in), Purple Floral was a rotary cutting and machine piecing dream to make.  Each piece just fitted together.  Lots of joy in both making and giving.