Showing posts with label Two Colour Quilt. Show all posts

Tuesday, 3 June 2025

Cobbled Nines - Part II


I sometimes wonder why I take such a long time to get my quilts quilted and finished.  This black and white beauty was made into a quilt top waaaayy back in 2014, as you can read in this blog post.  

It is probably one of my most favourite quilts of all time, made up from 'orphan' blocks where I co-ordinated the colours and went for a two-tone look.  It was also part of my black and white series.

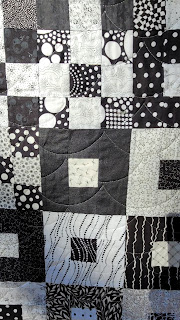
Cobbled Nines - perhaps I should have had a different angle for the photo
- there's the shadow of a tree going across it! :)


The photo below is from my original blog post when I had just put the top together.


Below are some detail shots - I really, really should have thought about the shadows!  Two detail shots and one of the backing fabric which has some very cute deer on it.


I quilted cobbled nines with a metallic silver thread, using a clamshell design on my domestic sewing machine.  There were a couple issued with thread breaking, until I remembered to adjust my top thread tension on my machine - oh what a difference that made!  

Cobbled Nines was donated to "Gather the Girls" as one of their silent auction items and it raised $280.  I would have liked to have seen it go for $375, as that was the set reserve price, however, the lady who won it is very happy.

My second quilt that I donated to Gather the Girls is Spring Splash.  Upon re-reading my post about Spring Splash, I had completely forgotten that I was going to donate it to a different cause!  So, here I am now, donating it to another very worthy cause.


Monday, 18 January 2021

Green Ocean Waves

 Half square triangles.  A "bazillion" of them, or so it seemed at the time.  Over the years, I had been cutting up left over pieces of green from my quilt making into 3.5in squares and then turning them into half square triangles (hsts).

Counting the hsts.

The white fabric was a reject from another project, where it appeared to be "too white" but worked perfectly in this project.  After making and trimming to size all of the hsts, I then had to find pieces of green to make up the bigger plain squares.

Selecting the fabrics for the plain squares.

In an Ocean Waves quilt there are 3 block types:  A, B and C.  It's all about the directions of the triangles in the blocks.  So row 1 is A, C, A, C and then row 2 is C, B, C, B and so-on until the whole quilt top is laid out.

Laying out the quilt top.

I pieced all the A blocks first, then the B and finally the C.  That was fine.  The tricky bit was the layout and keeping the triangles going the 'correct' way with the block placement.  It did play tricks with my eyes and thankfully I pieced the top at a Retreat, so there many opinions in the room!  I found it interesting by the divide of opinion in the room.  It was like or dislike!  Having so much green was quite polarising for some.

Then came the pressing before quilting.  All those seams!  I pressed a bit, took a break, pressed a bit more.


I quilted Green Ocean Waves with a wave design and used a khaki coloured thread which blended beautifully with both the white and the green  


More green for the backing, with the meandering line and dots, I really liked how it set off  and complimented the colours on the front.


The first whole quilt photo was taken indoors and it glows.


And.... here is the whole quilt photo, taken outdoors in the late afternoon dappled sunlight.  Awesome!


I gifted this quilt to my 15yr old nephew K for Christmas 2020.  As soon as unwrapped the gift, he wrapped himself up in it, then opened it up and spread it across the couch, covering up his Nana and Dad at the same time.  He was very, very happy.  Being a teenager, I wasn't quite sure how the quilt would be received.

The next morning, he asked me a whole lot of questions about how I made the quilt, did I cut out all the triangles individually, how did I put it together for quilting......  My Sister (his Mum) said to me later that he had been complaining about all the "blankies" being too small to cover him while watching tv or lounging around and he had been asking for a bigger one.  She was happy too.  

I am happy.  The response from K was far better than I could have imagined.


Monday, 2 March 2020

Paper Doilies, Log Cabins and a very quilty week...

Last week was so very, very quilty!  Lots of sewing time to be had. 😊

It was a wonderful week. Tuesday was 3 hours with a group, followed closely by Thursday which was slow stitching at a local shop for 2.5 hours.  I took an English Paper Piecing  (EPP) project.

My "doily" so far.  There's still another round to attach,
but I haven't chosen the colour yet.
The diamond spaces are left blank for the
background to show through.


This is my "Paper Doily" project which I started in 2019 at a class with Leesa Chandler.  I attended the class so that I could learn something new.  I had never realised all the other possibilities before of using paper pieces to make up patterns like this.  I had always attached them to each other and thought that was it.  Once the final round is attached, the whole piece will be appliqued onto a background.  Such a fun thing to do with some stash fabric and paper pieces.

Friday was the day for my local quilt group.  I had plans to take my machine and continue working on Specky Stars, however, other things called me away and I didn't get there.

On Saturday, 29/02 - Leap Year Day - I attended a 10am-10pm sewing day with a group 1 hour away.  I took a scrappy red/white log cabin of my own design to work on.  I spent quite a bit of time both before and after Christmas cutting into my red and white leftovers from previous projects (scrap) stash.  Being 100% cut out and having lots of chain piecing, which is very repetitive, was a fantastic thing to do while catching up with friends.


I stood up and looked over the back of my machine
for this shot.  Lots of chain piecing.
Plastic tub with each piece cut and in piecing
order from the centre out.


With a bit of luck, this log cabin quilt will hopefully be published into a pattern.  It's been quite a while since I last ran a class and wrote a proper pattern.

On top of pattern writing and making the relevant quilts, I have a self-imposed goal of completing 9 quilts by the end of July and 4 of those quilts I plan to exhibit.  A couple will become gifts, 1 is for a class and the other 2 I am not sure where they are headed to yet.

I'm feeling as 'pleased as punch' right now.  My goals are on track and I've spent some very precious time with some very special people.   Life is good.


Monday, 14 October 2019

9 Patch Illusion

Sometimes, when you have completed some very involved quilts, such as my versions of the 1718 Coverlet and Rotherfield's Grey, it is nice to work on something which has only 2 fabrics.

This quilt went together surprisingly fast!  Rotary cutting and strip piecing just made it so very easy.

9 Patch Illusion quilt hanging at the Kilmore Quilters Quilt Show in Oct 2019.

Backing fabric.

I had to wait until there was a quilt show to hang this quilt so that I could get it all in the photo.  It turned into an absolute delight to make and quilt.  


For the quilting, I kept it very simple.  Cross hatching through the 9 patch blocks and feathers in the borders.  I used Superior Threads #100wt rayon for the quilting.  I did not want the quilting to overpower the optical illusion of the 'waves' over the quilt top.


The hardest part of the whole quilt was choosing just 2 fabrics that would play well together because I did not want a plain white background.  I loved the dark teal as soon as I saw it, but the initial background I had chosen was unanimously rejected by those who live in this house with me.  Back to the shops to find another background.


In the craziness that only Quilters can understand, there were 3 shops  and approx 200kms of driving involved in the front and back fabric selections, which gave me 3 very nice days out!


Starting with in the ditch quilting..

Feather quilting around the outside border.
Sometimes simplicity is what you need to keep the mojo happening and this quilt did "soothe my soul" by giving me a fun project with terrific results.


The pattern for the quilt can be found here:  Rolling Waves Pattern published by McCall's Quilting

Tuesday, 17 April 2018

Happy Japanese

When I started making Happy Japanese, I have to admit that I was completely clueless as to what to do.  My good friend, H, was turning 60.  She rang me in September lasted year and mentioned her significant birthday.  I knew I wanted to make something for her, but was struggling as to what when she said she liked red and black in a Japanese style.

After some ruminating and sighing, I happened to glance at the fruit bowl, which was a gift from her some 8 years ago and was the perfect scheme for what she told me she liked.  Good grief, the right choices were there, under my nose in plain sight the whole time!!!

Here is my initial pulling of fabrics, which I sent a photo of to her for confirmation.  Yes, she liked my choices - phew!  By the way, H was thinking I was going a bit peculiar at the time and luckily for me hadn't put two and two together.
Now I needed a plan.  I toyed with Drunkards Path, circular patterns, and all sorts of things until I found this plan of squares on pinterest.  Apparently it is a plan for a crochet blanket.  I followed this plan, with my own fabric square sizes in multiples of 2.5in to get the size of quilt I wanted to make.


Here's how it started.... Lots of cutting and laying out on the floor for options.  I didn't use the white fabrics because they stood out too strongly and looked very out of place. 

Slowly, but surely the quilt grew.  I hand embroidered some sashiko pieces to add a textural and visual element to the other fabrics.  

Turns out, there was more variety in my stash and some newly purchased fabrics than I thought!

Here's the completed quilt.  Hubby was having a hard time holding it up for the photo, standing on a chair, outside in the wind.

And, lastly, some pics of the backing fabric, lovely red with gold ginko leaves and calligraphy on the centre fabric panel.  


 Finished off with fire engine red binding.

I quilted "Happy Japanese" on my domestic sewing machine with YLI threads in an all over swirl pattern to add movement to the very 'square' quit pattern.

I have kept the design idea page because this has turned out to be a true favourite quilt. 

Tuesday, 13 March 2018

Red and White

The great thing about fabric swaps is that you always get a good variety of fabric.  I took part in a 2½in x Half WOF* fabric swap for a year.  Each month you sent off your package(s) of fabrics and received the same number of sets in return.  I was always amazed each month that no-one sent the same fabrics to anyone else - all completely different.

I started to play with the red fabrics.  Initially I was going to include pink fabrics as well and make an Irish Chain quilt.

The final "red" selection


Not being completely sure of my plans, I took the reds (and pinks) off to a sewing day at a quilt shop.  There I found a lovely, slightly off white plain fabric.  This was the cause of the pinks being dumped.  Just red and white - I found my brain whirring overtime with ideas.  In the end, the simplest idea has turned out to be the best.

I used almost all of the reds and I'm super happy with the result.

It was lovely, rhythmic piecing - red and white alternating.  First I joined each red strip to a white strip and then I cross-cut them and sewed 4 patches and the quilt top grew from there.  I had a bit of indecision with the border before deciding to make a 'solid' red frame to complete the top.

I quilted this quilt simply with cross hatch red in the red squares and white in the white squares and a white cable pattern overlapping the two border colours.  

Cable quilting on the border.

It was then finished off with a pink backing and red binding.   Oooohhh lala........
Contrasting back
So simple, yet so pleasing to make, I am super happy with my red and white checkerboard.  To be donated to a Royal Children's Hospital (Melbourne) fundraiser as one of the silent auction items.  I do hope it will reach the $$$ value given from the professional appraisal (valuation).


*  WOF = width of fabric.