Monday, 14 October 2019

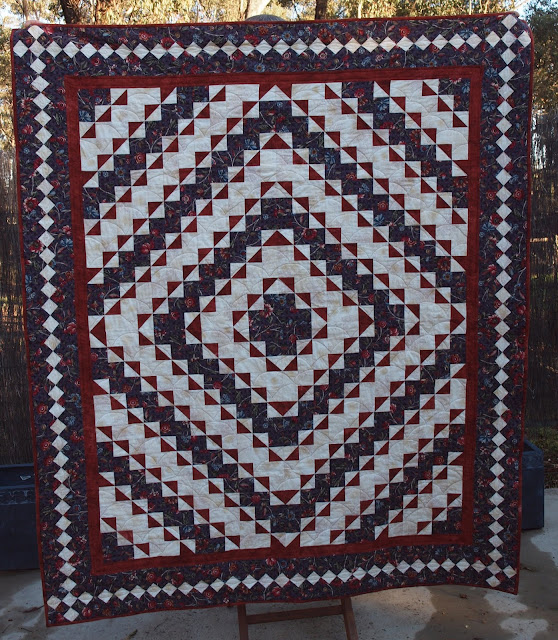
9 Patch Illusion

Sometimes, when you have completed some very involved quilts, such as my versions of the 1718 Coverlet and Rotherfield's Grey, it is nice to work on something which has only 2 fabrics.

This quilt went together surprisingly fast!  Rotary cutting and strip piecing just made it so very easy.

9 Patch Illusion quilt hanging at the Kilmore Quilters Quilt Show in Oct 2019.

Backing fabric.

I had to wait until there was a quilt show to hang this quilt so that I could get it all in the photo.  It turned into an absolute delight to make and quilt.  


For the quilting, I kept it very simple.  Cross hatching through the 9 patch blocks and feathers in the borders.  I used Superior Threads #100wt rayon for the quilting.  I did not want the quilting to overpower the optical illusion of the 'waves' over the quilt top.


The hardest part of the whole quilt was choosing just 2 fabrics that would play well together because I did not want a plain white background.  I loved the dark teal as soon as I saw it, but the initial background I had chosen was unanimously rejected by those who live in this house with me.  Back to the shops to find another background.


In the craziness that only Quilters can understand, there were 3 shops  and approx 200kms of driving involved in the front and back fabric selections, which gave me 3 very nice days out!


Starting with in the ditch quilting..

Feather quilting around the outside border.
Sometimes simplicity is what you need to keep the mojo happening and this quilt did "soothe my soul" by giving me a fun project with terrific results.


The pattern for the quilt can be found here:  Rolling Waves Pattern published by McCall's Quilting

Friday, 30 August 2019

Strippy 4 patch

A few years ago, I had purchased a charm square pack - American Primer by Moda - to make up a quilt of my own design.  So I chose a complimentary taupe fabric to use for setting the blocks in.

I drew up some ideas, simple ones such as 4 patches, pinwheels and so forth.  I made the first 4 patch and the edges didn't meet.  Made another one, still not matching.  Ruler out, no, my cutting and quarter inch seam were fine.  Still not matching up and pieces being different sizes.  Turns out the 5in squares were actually 5 x 4-7/8, when I actually thought to measure a 5in square before cutting it!!!  How did I not notice that?


OK - deep breath - make all the 4 patches and then trim them to a smaller size, finishing at 3.5in, in the quilt.  Quite a bit smaller than I had originally intended, but easy enough to work with.


Trimmings!!

But then after the frustration of the 5in squares not being 5in square, followed by the trimming, I ended up with such lovely neat and very cute little blocks.


All neatly trimmed and ready to chain piece the setting triangles to the blocks.  Ahhh.... bliss.....


Given how much I love strip quilts, it was an easy leap to set the 4-patch blocks on point and set them with taupe triangles, even if the cutting did have to be a little bit fussy to make the pinstripe run up and down the quilt.


A nice large piece of gorgeous Japanese border type print, which was fussy cut along the printing lines to make up the alternate strips.

Detail showing the Japanese woven fabric panels (before quilting).

The backing uses a remaining piece of stripe plus this gorgeous Toile scene type print.  

Detail showing the quilting.
Each panel was quilted according the pattern in each strip.

I decided to turn it into a coverlet, which is an old style where the wadding is left out, but it is still quilted and bound to make a light weight summer quilt.  This was a challenge because the fabric needed a good hot steam press after quilting to get rid of the ripples caused by quilting only 2 layers.

A piece of red, leftover from my son's quilt last year was just enough to make the binding for this one and it was the perfect shade of red!  When sewing the binding down, it was sometimes difficult to get the thread just in between the two layers of fabric.


And finally, here it is, hanging at the Victorian Quilters Showase in July in the Coverlets category.....


......  No, I didn't win a prize for this one, but that's okay because I am very pleased with how my coverlet turned out AND... I learnt some new skills with regards to how fabric and thread behave when you quilt without wadding.

Sometimes all you need is serendipity and time to make something you love.


Monday, 12 August 2019

Now I can share! - 1718 Simplified

Ahhh, the major exhibitions are over, for now and I can finally share my 1718 Simplified Quilt story.....

My excitement which I shared last year can now be shown as photos and I can tell the whole story of my own amazing personal journey.

The 1718 quilt had been a “want to make” quilt for me for many, many years, after I first saw a photo of it almost 20 years ago.  The chance to make my own version of the 1718 Coverlet and to travel to the UK from Australia with my quilt to visit the original quilt was truly a dream come true.

It was a picture, a very small picture inside the front cover of a patchwork book.  Interesting shapes and designs, seeming to be both logically placed and then random at the same time.  A conundrum.  One that I wanted to solve.  It was 15 years from when I saw that first little photo until I could start to make my own quilt.

During 2014, I chanced upon a brief advertisement, the quilt I had been coveting in the picture was being faithfully reproduced and a book was to be published.  In early 2015, I became the owner of that very newly released book...  The 1718 Coverlet:  69 Quilt Blocks from the Oldest Dated British Patchwork Coverlet by Susan Briscoe.

Getting there....
For a long time, it seemed like I wasn't really getting anywhere with the blocks.  I would prepare some applique blocks, put them into a zip loc sandwich bag and take them in my hand-bag for filling in waiting time or while on travelling.  When sewing in small stints and then changing to the next block, I lost where I was up to.  It wasn't until I laid all the blocks out on the floor, that I realised how far I had progressed.

I would often have little machine sewing sessions where I would make a group of blocks, say, all the square in a square, then maybe the hourglass blocks.  I found by doing this way, I could match things up a bit.  The 1718 Coverlet is symmetrical from left to right, but not top to bottom.  This was something I did not realise by looking at the book, but only picked up on when I was laying out the blocks.

There were many techniques used in the making of this quilt, including applique, piecing, english paper piecing, templates, fussy cutting and more.

Adding in the centre
A true labour of love - taking 3 years to make, with lots of hand and machine work.  Each block was carefully made, pressed and trimmed to the correct size. 


Completed centre panel.  Just love it!

I used a very, very fine wadding, called QuiltLite.  It was like a fine interfacing, but with a bit more give in it.  With so many seams and lots of applique, I wanted my quilt to hold and have a little bit of body to it because I wanted it to hold up to handling and hanging during the exhibitions.

Detail showing quilting with 100 weight invisafil thread and a 60/8 needle. 
The thread is a fine line, about the thickness of hair running down the needle shaft.

I used a very fine #100 weight thread to quilt each block to closely mimic the "coverlet" style of the original quilt, which it to make it look like it has no quilting over the patchwork.

Blocks after quilting before trimming and assembling.


Assembled blocks after quilting

Detail showing how the quilt as you was assembled without cover strips.
The method I chose for quilting allowed me to use a whole piece of fabric for the backing, with some stitch in the ditch on in the seam lines to attach it to the front with no sagging.

Not all blocks were easy to make, but all were very rewarding.


Ta Da!  A fully quilted, bound and labelled quilt.  Totally elated!

The coming together of this quilt was a complete joy.  Every block was wonderful to make, except the ‘cockerel’ (the block must have known that I don’t like chooks in general!!!).  My quilt has been called ‘1718 Simplified’ because I did not piece the applique backgrounds, allowing the unique shapes to be highlighted.  I used modern piecing and quilting techniques.

In June 2018, I was notified that my quilt had been accepted as part of the 1718 Exhibition at the Festival of Quilts, in Birmingham - a huge event that is well renowned on the world quilting calendar.  Of course I had to hand deliver it!  Off I went, with the quilt carefully packed into my hand luggage.  An incredible experience where I got to see the original 300 year old coverlet -WOW - attend lectures about the 1718 Coverlet; meet others who made their own versions of the coverlet and get my book signed by the author.

At The Festival of Quilts

1718 Simplified has been exhibited at and appeared in:
  • 2018 - Festival of Quilts, Birmingham, UK - part of the special exhibit celebrating 300 years of the original quilt.
  • 2018 Nov - Axedale Antics (local paper).  Article I was asked to write, telling my story of how and why I made the 1718 Coverlet.
  • 2018 - Quilt Mania magazine - issue 128 Nov-Dec 2018- Celebrating 300 years of Britain's oldest dated patchwork coverlet article.
  • 2019 January to May - with Grosvenor Shows, UK, as part of a travelling exhibition highlighting the 1718 Quilts throughout England.  Newark 18-20 January;  Ardingly 25-27 January; Harrogate 22-24 February; Duxford 8-10 March;
    Exeter 29-31 March; Quilts UK Malvern 16-19 May.
  • 2019 July - Victorian Quilters Showcase, Melbourne, Aust. - entrant in the mainly pieced, amateur, single person category.  Received an Highly Commended Award.
  • and is slated to appear in one or two more exhibitions during 2019.


Quilt Hanging in Melbourne at Victorian Quilters Showcase
My winning ribbon!

And.... would I make a second one?  Yes, I would.  

1718 has been the most interesting, at times challenging and
most delightful quilt that I have ever made.  

Thank you to those who supported me for your faith in me,
especially my Aunt Libby, who just "gets it"
and my husband Baden for his never ending patience and love.


Monday, 3 June 2019

Purple Floral

Started in a mystery quilt workshop, run by a member of my local quilt group, we were instructed to "not purchase fabric".  The requirement was to only use what is in your stash and to make it scrappy.  Well, I had no bits of scraps of any sort at that stage, having recently used them up, but, I did have big pieces and a few of them.

Backing onto front.
The lady running the workshop was concerned that with just 3 fabrics and not much variety that it might not work.  I think, had the purple floral been a tone-on-tone, it might not have.  There is so much variety in the print of the purple fabric, that it carries the pattern well.

Centre of quilt detail
We were instructed to pre-cut our fabrics before the workshop so that we could sew like the wind when there.  Each little zip-loc baggie had to be labelled so that we didn't get mixed up when the instructions were given out during the day.

Border detail
 Finished off with a french braid border, to which I added a 9-patch blocks to the corners.

I quilted Purple Floral on my domestic machine with clamshells over the centre of the quilt in a dusky purple 50wt thread, echo straight line quilting in the first border with brick red thread and then beads in the squares of the french braid with matching thread.

Back of quilt showing detail of the quilting.
I had great joy in completing this quilt this past week because I was able to complete it for my best friend from primary school for her 50th birthday.

I love the serendipity of how project completion often has someone who will be perfect for the item just appear.

Completed quilt.
 A really terrific pattern with dramatic effect.  Rectangles and squares, all flipped and turned to provide movement in the quilt top. 
Wrapped and ready for gifting.
Finishing at 161cm x 188cm (63in x 74in), Purple Floral was a rotary cutting and machine piecing dream to make.  Each piece just fitted together.  Lots of joy in both making and giving.

Tuesday, 14 May 2019

Disappearing Pinwheel

So, this is my third zip loc baggie project, as part of my New Year's resolution and quest to empty the shelf of those projects.  Disappearing Pinwheel (pattern from Missouri Star).

I chose to use the fabrics I have on hand - a big piece of white and 10in squares from my dwindling collection of Kaffe Fasset fabrics.

I started this project in 2016 when my gorgeous friend R decided to show me how to make it.  She has since finished hers.

The blocks as I opened up the zip loc bag.  Some completed and some not.
I ended up with 12 blocks which measure 11.75in (11.25in finished).  A nice size of layout of 3x4 blocks.  But, when my fabrics were put close together, the result was terrible, so I added in sashing strips and cornerstones.  It took me quite a while to find something in my stash and then I spied this lovely Liberty stripe.  Perfect, or so I thought.
But, the stripe was not at all the right fabric - I swapped the Liberty stripe for a plain red.  The stripe was just too busy and there was no-where for the eye to rest.


With careful cutting and calculating, I was able to get all of the sashing strips cut from the left over white fabric - phew!  It was a very close call to get 31 of 1.5in x 11.75in sashing strips and no room at all for cutting errors.  I think the cutting gods were on my side that day!


The top half of the notebook page shows working out for the sashing strips and the bottom half of the page is working out for the backing fabrics.

Ready for basting before quilting.

A pieced backing made from leftover blocks and two odd pieces from my stash....


Finished off with a red binding, which was the only deliberate purchase for this quilt.


I quilted this quilt as a "Strippy Quilt" with a rose pattern down the blocks and in straight lines in the long sashing strips.  I have used this technique previously and I really like how it gives another dimension to the quilt top.  The quilting thread used was Wonderfil #50 weight variegated lime green Tutti Cotton on top and Gutermann #50 weight cotton in the bobbin.  This thread has turned out to be a bit of a favourite to quilt with. It is so smooth in the machine and, as luck would have it, I had just enough to complete the quilt.


My Friendship Star version of the Disappearing Pinwheel will be donated the Royal Children's Hospital Melbourne via the Very Snuggly Quilts Program.

Pattern credit
** Disappearing Pinwheel Pattern can be found here on the Missouri Star website.


Monday, 29 April 2019

Road to St Louis - 16 patch aka "What was I thinking!"

At the beginning of April, I was asked to come up an idea for a Friday Night Retreat Project, using fabric pre-cuts.  There were suggestions of using Jelly Rolls, but as this is purely a volunteer task, I chose Fat Quarters because I had those and I wanted to challenge myself, plus the group members to use what they already own.

I decided to make this quit after seeing one at a Quilts in the Barn Exhibition a few years ago and liking it very much.  That quilter had used floral prints with solids and it has stuck in my mind ever since.  This block which can be very effective for little effort as it is a simple checkerboard pattern which has lots of scope for colour and pattern play.  


First set of blocks

While I haven't used or even replicated that first quilt I saw in the exhibition, I still want to make my own version of that with all new fabric one day.

Second pair of blocks
After testing what size to cut fabrics at and how much of the Fat Quarter would be used for the above two sets of blocks, I dove into the deepest darkest recesses of my stash and pulled out some very old as well as the “what was I thinking?” fabrics.  I chose my fabrics in 10 minutes by pulling them out and throwing them on the floor in pairs and checking that the all the fabrics worked together as a whole.


I then had a lovely afternoon home on my own and I sewed all day long, making blocks.  The very next day I laid the blocks on the floor, moved them around a bit, packed them up in order and sewed the top together at my local quilt group.

When I went online to do some research into the name of the block, I found quite a few free tutorials, including the references below. *^  There is nothing new about the 16 patch block or the method constructing it.  The first known publication of this block is Mosaic No. 20 Ladies Art Company 1897*  before being published again as Four Patch Variation Orlofsky, 1974 *  More recently, there have been online publications calling it 16 Patch Quilt Block ^ or St Louis 16 patch ^.

The 16 patch / Road to St Louis would have to be the quickest quilt I have ever made.  It was easy, it is effective and the size is only limited by how much fabric you have.


To quilt this quilt was super easy.  As I quilt on my domestic sewing machine, I chose to give extra life and movement by quilting an "orange peel" type of pattern.  You could just as easily cross-hatch it too, but I like the effect of  what I did.


The binding fabric is a Penny fabric which was donated by a friend.  The backing fabric and wadding have come from the donation stash at my local quilt group.


My Road to St Louis or 16 Patch will be donated after the Kilmore Quilters Retreat to the Axedale Quilters for their charity quilts which go to local people in need.

Finished Quilt Size:  150cm x 183cm  (60in x 72in).


To give credit where credit is due - these are the resources I have referenced: 
* Jinny Beyer - The Quilters Album of Patchwork Patterns, Breckling Press pub 2009

Penny fabric - Penny was a quilter who is now an angel, her children passed on her very sizable stash to a friend.  Penny now lives on in many quilts.